
Model a spaghetti bridge with Rhino Grasshopper
Captivate your imagination and challenge your engineering skills by diving into the world of spaghetti bridge with Rhino Grasshopper.
This innovative approach combines the playful medium of pasta with the powerful parametric design capabilities of Rhino Grasshopper, offering a unique blend of creativity and technical precision.
Discover how you can push the limits of structural design, optimizing and bringing your most intricate spaghetti bridge concepts to life in an engaging and insightful way.
Table of Contents
What is a spaghetti bridge?
A spaghetti bridge is a lightweight structure made primarily from spaghetti or other types of pasta. It is often used as an educational tool in engineering courses or competitions to teach principles of structural engineering and material science.
Participants are challenged to design and construct a bridge using spaghetti as the main construction material, sometimes with restrictions on the type of adhesive that can be used to hold the pasta together.
The objective is typically to build a bridge that can support the maximum possible weight, demonstrating an understanding of load distribution, tensile and compressive strengths, and the efficiency of various bridge designs.
These competitions highlight creativity, problem-solving skills, and understanding of engineering principles in a fun and engaging way.

How can Rhino Grasshopper help me to build a spaghetti bridge?
Rhino Grasshopper is a visual programming tool integrated with Rhino3D, a 3D modeling software. It allows for parametric design, enabling architects, engineers, and designers to explore complex geometries and structures through an intuitive graphical interface.
Here’s how Rhino Grasshopper can aid in building a spaghetti bridge:
- Design Exploration: Grasshopper allows for quick iterations of bridge designs. You can easily adjust parameters such as length, height, curvature, and the distribution of structural elements, enabling you to explore a wide range of design possibilities without manually modeling each option.
- Structural Optimization: Through Grasshopper, you can use optimization tools and plugins like Galapagos or Karamba3D to find the most efficient structure that meets your criteria (e.g., minimal material usage for maximum strength). These tools can simulate loads and analyze the structural performance of your spaghetti bridge design, helping you optimize the arrangement of spaghetti strands for strength and stability.
- Fabrication Instructions: Once you finalize your design, Grasshopper can be used to generate fabrication instructions or diagrams. This can include the length of each spaghetti strand needed, where to apply glue, and how to assemble the pieces. For spaghetti bridges, this might translate into detailed plans for constructing the bridge model in real life.
- Parametric Geometry Control: Grasshopper excels in controlling complex geometries. For a spaghetti bridge, controlling the curvature and distribution of spaghetti strands can lead to a more aesthetically pleasing design that also meets structural requirements.
- Simulation and Analysis: Various plugins allow for the simulation of physical properties and behaviors. While most are geared towards traditional engineering materials, they can provide insights into force distribution and potential weak points in your spaghetti bridge design, which can be invaluable for ensuring that your bridge can hold the intended load.
By using Rhino Grasshopper, you can push the boundaries of conventional spaghetti bridge designs, exploring innovative structures that might be more efficient or capable of holding more weight.
The tool’s visual programming environment makes it accessible even to those with limited coding experience, allowing for a focus on creativity and design exploration.

Step by step Modeling a spaghetti bridge with Rhino Grasshopper
Modeling a spaghetti bridge in Rhino Grasshopper involves a series of steps that leverage both the modeling capabilities of Rhino and the parametric design functionality of Grasshopper.
This guide will outline a basic approach to designing a spaghetti bridge. Note that familiarity with Rhino’s interface and basic concepts of parametric design in Grasshopper is assumed.
Step 1: Define the Bridge Span and Constraints
- Start in Rhino: Open Rhino and create a new file.
- Define Geometry: Sketch the basic outline of your bridge, including the span length and width. This can be a simple line or a more complex curve, depending on your design intention.
Step 2: Launch Grasshopper
- Open Grasshopper: Within Rhino, go to
Tools > Grasshopperto open the Grasshopper interface. - Reference Geometry: Use the
Geometrycomponent to reference your bridge outline from Rhino into Grasshopper.
Step 3: Create the Bridge Structure
- Divide the Span: Use the
Divide Curvecomponent to divide your bridge span into equal segments. These segments will represent points where spaghetti strands might connect or where supports might be placed. - Generate Supports: If your design includes vertical supports or arches, use components like
Moveto vertically translate points andLineto create lines representing spaghetti strands between these points.
Step 4: Parametrically Model the Bridge Deck and Supports
- Deck Structure: To model the deck, use components like
LoftorSweep1to create surfaces or lines between the support points. - Support Structure: Use
Linecomponents to connect points across the bridge deck to simulate the spaghetti strands that will form the structural supports. Adjust the parameters to control the density and arrangement of these strands.
Step 5: Structural Optimization (Optional)
- Load Karamba3D: If you have Karamba3D installed, you can use it to analyze and optimize the structural performance of your bridge. Input your geometry into Karamba3D components to simulate loads and analyze stress distributions.
- Optimize: Use optimization plugins like Galapagos to iteratively adjust your design parameters based on the structural analysis, seeking an optimal balance of strength and material use.
Step 6: Documentation and Fabrication Instructions
- Bake Geometry: Once satisfied with your design, you can “bake” the Grasshopper geometry into Rhino, turning it into standard Rhino objects.
- Generate Plans: Use Rhino’s documentation tools to prepare drawings or plans that detail the construction of your spaghetti bridge, including lengths and connections of spaghetti strands.
Step 7: Physical Model Construction
- Translate your digital model into a physical spaghetti bridge by carefully following your fabrication instructions. Consider the properties of spaghetti as a material, such as its flexibility and how it handles tension and compression.
This basic workflow introduces the concept of designing a spaghetti bridge with Rhino Grasshopper. The process encourages experimentation and iteration.
As you become more familiar with the tools, you can explore more complex designs and structural systems. Grasshopper’s parametric capabilities allow for a high degree of customization and optimization, making it a powerful tool for educational and engineering design challenges.

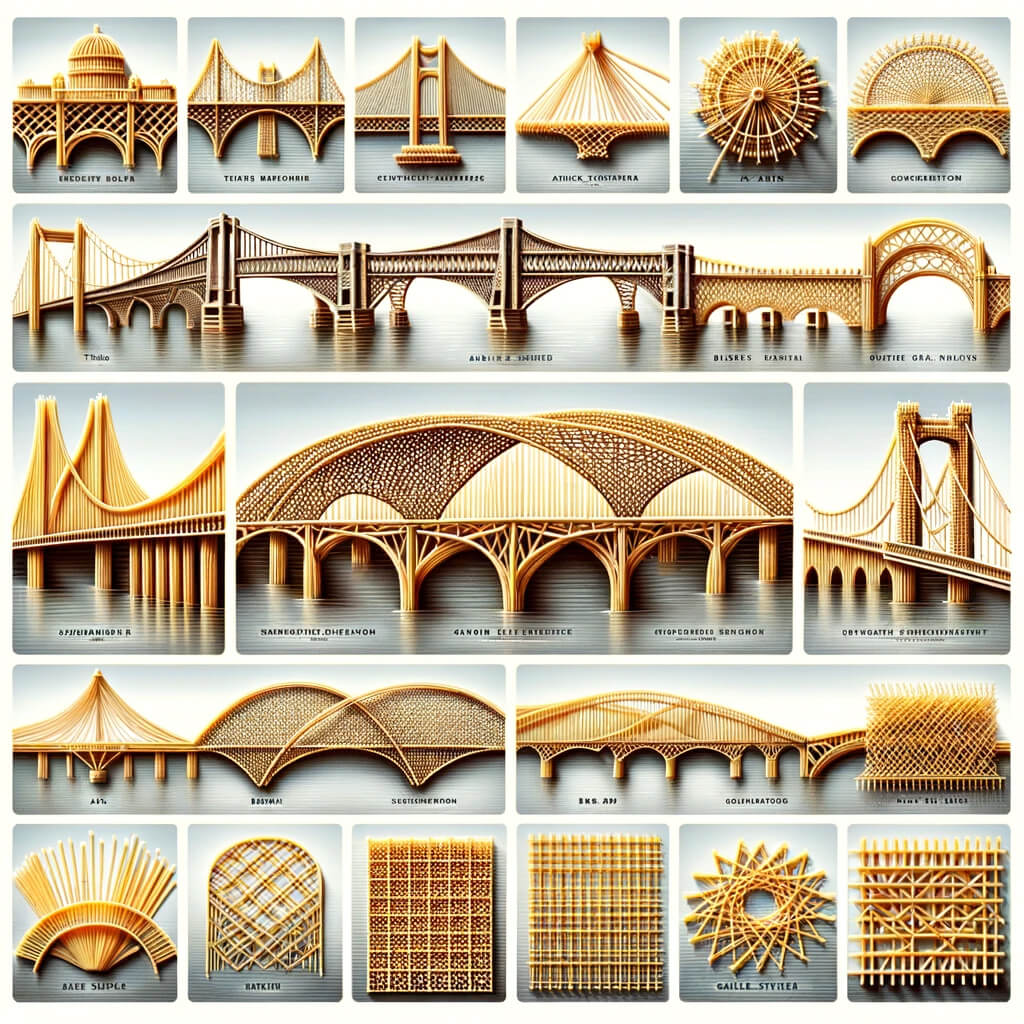
Different patterns of spaghetti bridge
Different patterns in spaghetti bridge construction can significantly affect the bridge’s strength, stability, and aesthetic appeal. Here are some common and effective patterns used in spaghetti bridge designs:
1. Truss Bridges
- How it Works: Trusses are structures composed of triangular units connected at joints. They distribute loads evenly through these triangles, making them incredibly efficient for bridge construction.
- Spaghetti Application: Spaghetti strands are used to form the triangular shapes, creating a lightweight yet strong framework. This is one of the most popular patterns due to its combination of strength and material efficiency.
2. Arch Bridges
- How it Works: Arch bridges work by transferring the weight of the bridge and its loads into horizontal thrusts restrained by the abutments at either side.
- Spaghetti Application: Spaghetti strands are curved and glued together to form an arch shape. The natural shape of an arch efficiently distributes the load, making it suitable for longer spans.
3. Suspension Bridges
- How it Works: These bridges feature cables (in the case of spaghetti bridges, strands of spaghetti) suspended between towers and attached to the deck below. The tension in the cables supports the bridge’s weight.
- Spaghetti Application: This design is more challenging with spaghetti due to the need for tensioning the strands correctly. However, it can create visually striking models that demonstrate the principles of tension and compression.
4. Beam Bridges
- How it Works: The simplest form of bridge, a beam bridge consists of a horizontal beam supported at each end. The weight of the bridge and any additional load creates bending moments that the beam must resist.
- Spaghetti Application: Multiple layers of spaghetti are glued side by side to form a thick, strong beam. This pattern is relatively simple to construct and demonstrates basic engineering principles, though it may not be as efficient or strong as others for longer spans.
5. Cable-Stayed Bridges
- How it Works: Similar to suspension bridges, cable-stayed bridges are supported by cables running directly from the deck to one or more towers.
- Spaghetti Application: Spaghetti strands are used as cables, creating a fan or harp-like pattern. This design can achieve considerable spans and demonstrates an elegant balance of forces.
6. Grid Bridges
- How it Works: This pattern involves creating a grid or network of interconnected spaghetti strands. The grid distributes the load across a wide area, providing strength and redundancy.
- Spaghetti Application: The grid is constructed by laying spaghetti strands in a crisscross pattern and gluing them at the intersections. This can be effective for the deck or for the side panels of the bridge.
Construction Tips:
- Glue Selection: The choice of adhesive is crucial. It needs to bond well with spaghetti, be durable, and, ideally, not add excessive weight.
- Spaghetti Treatment: Some builders soak spaghetti in water or use heat to bend it into desired shapes, especially for arches or curved elements.
- Load Distribution: Understanding how the bridge will carry and distribute weight is key to choosing a design pattern. Points of maximum stress should be reinforced.
Each pattern has its unique challenges and advantages, and the choice of design often depends on the specific goals of the project, such as maximizing load capacity, span length, or demonstrating particular engineering principles. Experimentation and testing are integral to the learning process in spaghetti bridge construction.
Conclusion
As we’ve explored the innovative fusion of culinary materials and cutting-edge software, it’s clear that building a spaghetti bridge with Rhino Grasshopper not only enhances our understanding of structural engineering principles but also unleashes our creative potential.
This journey through design, simulation, and optimization showcases the limitless possibilities when unconventional tools and materials meet.
Embrace the challenge and let your imagination soar, as the combination of spaghetti and Grasshopper invites you to redefine the boundaries of architectural design and engineering.